alexdk
Restricted to 33BHP
 Best regards Alex (the Dane)
Posts: 51
|
Post by alexdk on Apr 3, 2013 11:46:12 GMT 1
Hi all, My name is Alex Ranch and I live in the northern part of Denmark. Last year I traded my old Yamaha 600 Ténéré (year 1987) into my current Honda NTV from 1989. When I traded myself into the NTV it had already done 150.000 km and had just had the engine swapped with a “new” engine with only 23.000 km. However the previous owner had used the NTV as his winter transportation, so the NTV looked kind of tired and rusty. This is a picture from last year:  I still have the old engine with 150.000 km and it’s still a runner, I simply need to change the cam-chain as the wedges are under their limits + some TLC as the engine has been standing in my shed for the last 1½ year. However here in Denmark we are (Unfortunately) using lots of salt on our roads in winter time, so my little NTV had plenty of rust and sign of wear after the 150.000 km.    But the rust didn’t stop me. Last year I did 15.000 km problem free kilometers on my NTV. It brought me to Germany, Norway, Finland, Sweden and Nordkapp  Wisiting Nordkapp  Wisiting Germany together with my better half:  Wisiting Finland:  Camping a few kilometers from Nordkapp:  On top of that I also used the NTV on small weekendtrips together with my brother  I’m loving my trusty NTV, so to “scratch her on the belly”, I decided to do a little maintenance this winter. Late October 2012 was the end of my motorcycle season. I stored my NTV in my shed and started to dismantle the old trusty. I forgot to take a lot of pictures, but in short, I broke down the old lady in atoms and send all the metal bits of for powder coating. The engine does not need any TLC at this moment, so I’m only cleaning it up before it gets back into the frame. The exhaust had the mandatory popping on the over run, and I kind of guessed it had a few holes. So I sanded the exhaust and boy was I surprised  ; the exhaust was full of small holes,   but more worrying was the connection where the pipes go into the exhaust. The connection was simply non existing  I have a good friend who is pretty good with a welder and a CNC-machine, so the exhaust is saved (more pictures to come). 14 days ago I delivered all the metals part for powder coating. I decided to paint the frame in silver metallic, the rims white and all the small metal parts got turned black. On top of all the powder it got a layer of clear I had secured all the threads with bolts, so no paint will plug up the threads on my NTV. And then came the day… last Thursday I picked up my parts from the painter, and boy was I a happy camper ;D That powder with clear is looking like a million. So with my hands above my head I started to re-assemble the old lady on our terrace on the 1. Floor, enjoying the view over Denmark’s most beautiful fjord. It was a perfect day, all the new shiny parts went together perfectly and the winter had finally let go, and the sun was finally shining and telling me “The summer is finally coming to Denmark).   After a few days on our first floor, I moved the frame back into my little shed to make the chassis rolling again. This is the bike in its current glory, I’m hoping for a few extra hours in the day, so I can add some more parts to the old trusty ;D  best regards Alex |
|
|
|
Post by noakira on Apr 3, 2013 12:02:25 GMT 1
Hello Alex - what a fantastic job you've made of your revere. Q: What is your chasis number PC22........  ?? Just the last 4 digits on the chasis plate will tell where abouts in the production run your bike was and if there are different numbers for different states. |
|
alexdk
Restricted to 33BHP
Best regards Alex (the Dane)
Posts: 51
|
Post by alexdk on Apr 3, 2013 13:39:22 GMT 1
Hi Noakira, I'm actually not quite sure. I will look at the frame number when I get home from work ;D I'm pretty sure the framenumber is "RC33", but when I look at the below chart, its not corresponding with the year 1989.. However I'm totally sure its a 650 cc engine ntvhonda.proboards.com/index.cgi?board=revere&action=post&thread=2898"e=17949&page=1I know the previous owner imported the bike from Germany to Denmark. And the importrules in Denmark are kind of difficult to understand. On my registrationpaper it says "First registration date year 1995", but I have always just figured that the year 1995, was the year the bike was imported into Denmark and not the actual construction year.. My NTV is with the old style clip-on handlebars, so I figured it had to be a year 1989  Guess who is feeling kind of stupid, not knowing what year your bike is from Best regards Alex |
|
gills
Bad ass biker

Posts: 262
|
Post by gills on Apr 3, 2013 14:19:20 GMT 1
I'm pretty sure the framenumber is "RC33", but when I look at the below chart, its not corresponding with the year 1989.. However I'm totally sure its a 650 cc engine The 600cc version of the Revere was only done for the UK and a couple of other countries, due to the tax advantages of a sub-600 engine. Germany, along with the majority of other places, got the 650cc Revere. When the NTV replaced the Revere, there was just the one 650cc version. I think the PC22 model code was just used for the 600cc Reveres. Alex, you're probably about right with '89. It's not an '88 model as you've got a remote preload adjuster for the rear shock, so it must be between '89-'92. Nice looking bike, by the way. It will look stunning once you've finished it. Look forward to seeing more photos as you progress.... |
|
alexdk
Restricted to 33BHP
Best regards Alex (the Dane)
Posts: 51
|
Post by alexdk on Apr 5, 2013 9:14:29 GMT 1
Good morning, I ran into a problem the other night. As I wrote earlier, I got my rims powder coated, but unfortunately didn’t cover up the small holes on the backside of the rim good enough. So in order to fit the rim on the shaft housing, I had to hone the small holes in order to fit the rim. After I had honed the small holes I wiped the dust away with my hand, but when I afterwards fitted the rim to the shaft housing I had to use the wheel shaft to pull the rim unto the shaft housing. I seemed like a good idea at the time, but then it struck me… “What do I do when I want to change the tire next time?”….. I loosened the wheel shaft and wanted to pull the rim of the shaft housing, but the rim was stuck :-( What to do.. I tried penetration oil and a little hammering with a rubber hammer, but the stupid rim wouldn’t budge… Thoughts started to fly round my head… and I just hated the idea of gathering my NTV, knowing that I would have a problem when I need to change tire in the future.. Thoughts were flying and after ½ liter of coffee, I remembered my old bearing puller… I had my friend (the same that helped me with the previous exhaust problem) make me a solid metal cylinder (45mm x 40mm) to put inside the rim, so I could pull the rim of the shaft housing.. I hooked up the bearing puller and the metal cylinder and after 20 seconds the rim was loose of the rim, and again I was a happy camper :-)  |
|
rodh
A-Road rider Limited to 70

Posts: 84
|
Post by rodh on Apr 5, 2013 20:21:50 GMT 1
:)Great story and photos. What a lot of experience can be had for cheap with an NTV. Shame we have the channel stopping us.
Keep the pictures coming.
Regards,
Rod
|
|
alexdk
Restricted to 33BHP
Best regards Alex (the Dane)
Posts: 51
|
Post by alexdk on Apr 8, 2013 9:10:29 GMT 1
After a few days, I am a little closer to the finish line. I have had a productive weekend, and really made some progress on the old trusty ;D I untangled the wiring, which looked like a birds nest, and fitted it on the NTV. It's one of those things I have feared the most, so I really hope that all my labels on the lomb have paid off, so when I hook up the battery all the wires are connected as intended  I then started the process of fitting the wiring back on to the frame.. wauu that time consuming  I managed to route the entire lomb back onto the frame. Fit the rear HT coil, bolt on the rear light and mount the headlight. I furthermore cleaned the engine. Its just so much easier to do a thorough cleaning when the engine is out of the frame.. its a time consuming job, but when looking at the engine afterwards, is really pays off.  So now the engine is shining again and its so much easier to do the valve inspection, I measured the valves before the engine gets back into the frame. Its 12.000 km since my last adjustment and only two valves needed a little adjustment ;D  I furthermore installed four new sparkplugs, so the engine should be in top condition ;D |
|
alexdk
Restricted to 33BHP
Best regards Alex (the Dane)
Posts: 51
|
Post by alexdk on Apr 15, 2013 8:50:54 GMT 1
Another weekend has ended and I had a few hours in the shed  This close to the "ending" everything is taking a really long time. I don't know why, but as I am putting the pieces back together I still find small little things I which to change / Improve. Last weekend ended with me doing the valves on the engine and attaching the wiring back onto the bike. So this weekend started with me doing a lot of Alu polishing.. I polished both valve covers + left and right motor covers. It takes hours to do the polishing, but when it’s time to put the covers back unto the bike with new gaskets it’s all worth it. Sorry for the blurry picture, my phone have seen better days. But the below picture should show the shiny NTV engine with the polished covers:  Furthermore I managed to fit some small items back unto the bike (sidestand, motor mounting bracket, eg.) and put the first piece of fairing back. It really helped to see the first piece of fairing back on the bike ;D  As a small improvement I took the old oil drain bolt. Drilled a 6mm hole in the old bolt and fitted a "NeoDyn" magnet into the hole. I have read about this approach on Danish site for off road driving. The idea is that any metal wear inside the engine, should be transferred by the oil to the magnet in the drain bolt where it sticks.. I know its possible to buy factory bolts which already has a mounted magnet, but the ones I have seen and bought are VERY weak So I'm going to try with a very strong NeoDyn magnet.. I'm just hoping that the strong magnet wont pull so hard on the gear, so I'm going to loose any horsepower  Now I “only” need to do the following before the old trusty is back on the road: - Mount the engine back into the frame (I’m really looking forward to the day, where the engine again is back into the frame)
- Install and sync the carburetors
- Install the airfilterbox
- Reinstall the complete cooling system
- Paint my exhaust with heat resistant paint + and mount with new gaskets
- Mount both braking systems with new brake pads
Best regards from Denmark |
|
|
|
Post by rj2para (Bisto) on Apr 16, 2013 8:59:17 GMT 1
She is looking great. I am looking forward to a few crisp shots of her in the sunshine. All clean before your first ride. |
|
alexdk
Restricted to 33BHP
Best regards Alex (the Dane)
Posts: 51
|
Post by alexdk on Apr 16, 2013 12:16:29 GMT 1
Late last night I decided to put the engine back into the frame. The engine had been standing on the ground the last couple of days and I really really wanted to get the engine back into the frame.. I raised the engine with the jack and let me tell you, its NOT a simple job for one man I tried to center the engine while raising the engine, trying not to scratch my newly powder coated frame. All the sudden I felt that the engine made contact with the frame while raising, and a few scratches (battle scars) were on my frame  A lot of not so nice words came out of my mouth when I saw the scratches..... "why didnt I wait a few couple of days, so I could get some help from my brother"... I nearly ruined my night, but after a lot swearing and a whiskey, I started to accept what had just happened At 12 seconds, the video shows the scratches on the left front motor mount. Now its been 12 hours and I´m okay again and the built can continue ;D Best regards from Denmark |
|
|
|
Post by McF on Apr 16, 2013 21:12:55 GMT 1
Late last night I decided to put the engine back into the frame. The engine had been standing on the ground the last couple of days and I really really wanted to get the engine back into the frame.. I raised the engine with the jack and let me tell you, its NOT a simple job for one man I tried to center the engine while raising the engine, trying not to scratch my newly powder coated frame. All the sudden I felt that the engine made contact with the frame while raising, and a few scratches (battle scars) were on my frame A lot of not so nice words came out of my mouth when I saw the scratches..... "why didnt I wait a few couple of days, so I could get some help from my brother"... I nearly ruined my night, but after a lot swearing and a whiskey, I started to accept what had just happened At 12 seconds, the video shows the scratches on the left front motor mount. Now its been 12 hours and I´m okay again and the built can continue ;D Best regards from Denmark That's a shame and exactly the kind of little blemish that gets Norfolknchance really upset - he goes for the pristine finish (kind of  ) I have found (through similar experience) that the easiest way to get everything lined up is to install the engine into the frame but without the shaft drive (Cardan?) in the swinging arm. It's pretty simple then to offer up the engine, get it bolted into place and then offer the shaft (Cardan) through the swinging arm and into the universal joint. Like most experience, it's something you gain 2 minutes after you need it! |
|
alexdk
Restricted to 33BHP
Best regards Alex (the Dane)
Posts: 51
|
Post by alexdk on Apr 17, 2013 14:40:16 GMT 1
Hi McF, I went and looked at the "horror" last night... and it still upsets me a little bit, but I guess the disappointment always comes with the first scratch My initial plan with the NTV are still to use it as my everyday bike.. I don't need a showbike, I still want to ride in the rain and that is exactly why I still love my NTV scratch or no scratch ;D The build must go on.. Last night I managed to fit the cooling system on the bike and later today I will hopefully install my newly cleaned carburetor back onto my bike. More pictures to come ;D |
|
|
|
Post by McF on Apr 17, 2013 20:33:33 GMT 1
I like a nice clean, tidy bike, but would much rather be riding it than polishing it
Sadly, scratches and blemishes do sadden me, but as you say, you'll get over it - it's just the first one that's most difficult to accept, especially when you did it yourself!
|
|
alexdk
Restricted to 33BHP
Best regards Alex (the Dane)
Posts: 51
|
Post by alexdk on Apr 19, 2013 9:22:14 GMT 1
Hi All, Last night I filled fluids back on the old trusty The old trusty were re-filled with new oil for the shaft, new engine oil + filter (10-40 synthetic) and a few liters of fresh coolant ;D During the comming weekend i'm hoping to get the chance to mount the carburators and airbox back onto the engine and finally put the gastank on top.. This should (hopefully) result in the first start efter the rebuild ;D |
|
alexdk
Restricted to 33BHP
Best regards Alex (the Dane)
Posts: 51
|
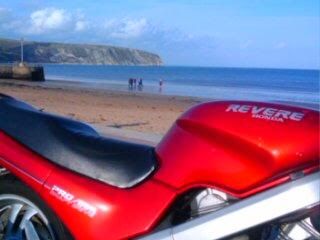
Post by alexdk on Apr 29, 2013 8:26:53 GMT 1
Hi All, Late last thursday I received the last parts from the powder coater. I worked in the shed until 2 AM, fitting the parts and making the old trusty ready for the parade friday morning. However the parade (250 km drive) resulted in a few errors... One bike overheated and another bike got a flat tire, but the old trusty drove like never before ;D Not a single problem.... I'm so grateful that my bike is back on the street and everything is working as new.. Here is a few pictures of how she is looking:     I do like those white rims.. but lets see how they do in the everyday driving Best regards from Denmark ;D |
|


 ; the exhaust was full of small holes,
 ??
?? 


 )
)