|
|
Post by thatsawkward on Dec 10, 2011 18:35:54 GMT 1
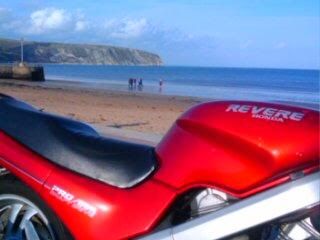
Spent some time on the new Powerbronze Colt fairing today... Not got very far !!! This is the stem clamp that fits with a U-Bolt....  Then you bolt the front frame to the clamp....  Then the headlight to the front frame. As you can see, the amount of wiring that is squashed into the headlight is quite a phenomenon..... Usefully, Powerbronze now supply a sort of "dashboard" - a piece of plastic that finishes off the inside of the fairing nicely. The underside of this will house my fusebox as I think it should be well sheltered from the elements and can be removed with 4 small bolts - easy to get at fuses hopefully. And here is stage one of my sophisticated painting and low-bake oven (note the fan heaters!)... This is the metallic base coat after a couple of coats.  As you can see, the Revere is almost complete...(!) Oh hang on, where did I put those forks? Tomorrow I will apply a coat or two of the Candy Borgogne Red colour and will try to take more pics. All paint supplied by RS Bike Paints who I found extremely helpful in understanding the process (and who told me to be patient!!). My views on fitting a Powerbronze fairing so far? Pretty simple and well designed (unlike the wiring in the headlight!). Their instructions are pretty useless (they have diagrams and instructions for what looks like a much older style of frame - this latest one is much simpler) but its all been self-explanatory so far.... |
|
|
|
Post by rj2para (Bisto) on Dec 10, 2011 22:50:27 GMT 1
Nice workshop. Bike is looking good so far. see you still have the old forks in the rear of the short or have you sold them now? This project has the makings of a new project page for the website. looking forward to the next installment. And there was your bike looking forward to the quiet life after Outlaw.  |
|
micawber
All Weather Rider, well hard
 No longer lurking in the shrubbery.
Posts: 151
|
Post by micawber on Dec 11, 2011 1:28:40 GMT 1
Hi Thatsawkward.
That set up looks similar to mine when I fitted a Powerbronze Voyager last year. I bought it secondhand but it came with full instructions. There was no information on how to arrange the extra wiring from the headlamp with mine either.
When I have bought fairings in the past they have come with some sort of extension loom, leaving the original wiring inside the headlamp shell which is usually mounted further forward than
the original. Powerbronze did not supply one with the Voyager, or at least I did not get one with mine.The original wiring will stretch but there seems to be some strain on the actual headlamp wires. There is still a lot of slack in the rest of the loom. Perhaps the Revere is different, but for safety I made an extension for the headlamp wires as I didn't want to be plunged into darkness on a remote road in the rain and dark.
I used a section from an old inner tube to loop the rest of the loom into a fat sausage with cable ties at each end to keep the weather out. More cable ties were used to secure this to the fairing frame behind the headlamp. It took a few goes before the bars turned freely without too much pull on it.
I assume that the Revere has the same headlamp shell as the NTV in which case you have to ask yourself how the **** am I going to change the headlamp or pilot bulb without taking the fairing off to get at the screws in the headlamp shell?
My solution was to get a used shell from a breakers and enlarge the hole in the back until it was big enough to get my fingers into from underneath to change the bulbs.
I have been using the fairing for nearly a year and a half now and it has become part of the bike. No electrical problems and no problems changing bulbs. An occasional check on the mounting bolts and plastic screws and that's all.
I hope the above helps.
Micawber.
|
|
|
|
Post by thatsawkward on Dec 11, 2011 9:56:29 GMT 1
Perhaps the Revere is different, but for safety I made an extension for the headlamp wires as I didn't want to be plunged into darkness on a remote road in the rain and dark. I used a section from an old inner tube to loop the rest of the loom into a fat sausage with cable ties at each end to keep the weather out. More cable ties were used to secure this to the fairing frame behind the headlamp. It took a few goes before the bars turned freely without too much pull on it. I assume that the Revere has the same headlamp shell as the NTV in which case you have to ask yourself how the **** am I going to change the headlamp or pilot bulb without taking the fairing off to get at the screws in the headlamp shell? My solution was to get a used shell from a breakers and enlarge the hole in the back until it was big enough to get my fingers into from underneath to change the bulbs. Excellent advice, thanks Micawber. I do think I need to revisit the wiring as it seems a little tight - hard for me to be sure as neither the forks or the bars are fitted yet. And I hadn't even thought of changing the bulb!! Good one.... |
|
|
|
Post by thatsawkward on Dec 11, 2011 9:59:17 GMT 1
see you still have the old forks in the rear of the short or have you sold them now? Still got the original (single disc) Revere forks plus the CBR600 F2 (twin disc) forks if anyone is interested... |
|
|
|
Post by thatsawkward on Dec 11, 2011 18:58:44 GMT 1
Disaster!!Spent hours spraying today and got what I think is a good result - except the colour!!! The paint is supposedly Honda R107C Candy Bourgogne Red (see the old mudguard to the left) - but this looks completely wrong! Before I bother applying the lacquer, does anyone have any advice?? I know paint changes with lacquer and with fully drying, but this difference looks like the wrong colour match...... I'm not sure any amount of drying and lacquering will magic it into the right colour will it  ? Anyone?? 
|
|
|
|
Post by McF on Dec 11, 2011 19:46:53 GMT 1
Other than the mudguard, how many other components are that colour?
I prefer the new colour of your fairing, it will look great with some lacquer on.
Perhaps you should do all of the old components?
Who sprayed the mudguard etc? Can you be certain what paint code was used?
|
|
|
|
Post by thatsawkward on Dec 11, 2011 20:08:04 GMT 1
Other than the mudguard, how many other components are that colour? I prefer the new colour of your fairing, it will look great with some lacquer on. Perhaps you should do all of the old components? Who sprayed the mudguard etc? Can you be certain what paint code was used? I just assumed the bike was the standard colour - it looks the same as the others in the members Gallery - the tank, sides and rear plastics all look original with original decals etc. I really didn't fancy painting the tank....! May just need to wait and see what it looks like tomorrow.... |
|
|
|
Post by rj2para (Bisto) on Dec 11, 2011 20:55:30 GMT 1
Your bike is the same colour as mine having seen them side by side in daylight.
As Mcf says I like the result. I hope you are happier in the morning. I agree it would be a lot of work and a shame to respray such a tidy bike.
|
|
micawber
All Weather Rider, well hard
No longer lurking in the shrubbery.
Posts: 151
|
Post by micawber on Dec 11, 2011 21:46:20 GMT 1
I have not had much experience with painting bikes but that bike as I recall from the photos is extremely tidy so I wouldn't risk messing up the paintwork on that. I would let the fairing paint dry thoroughly for a day or so then lacquer a small part such as the panel that joins the side panels at the bottom.
Then if the colour doesn't match the original bike colour go back to the paint supplier for advice on the paint match and/or replacement paint.
It's possible that the bike colour has faded over the years which is another thing to consider -it would then be lighter than a new batch of the correct paint code.
Don't do anything hasty, have a think and consider the options as it would be a shame to spoil the bike, or the fairing, after all your effort.
Micawber
|
|
|
|
Post by Buzzin (^_^) on Dec 12, 2011 0:56:51 GMT 1
Ehm, hold on, where did you get the colour info from? an NTV, or a Revere? Revere's were made a slightly darker red metalic and the NTV was slightly brither red, not metalic. If however your bike is the same colour as RJ's bike it should already be the dark colour  (same as mine btw) Whoever gave you the colour info might want to share the blame? If it was the paint dealer, perhaps he can change your spraycan for the right colour? It's not impossible to still spray the right colour over the layers you have now......just apply a few layers and it should come out a lot more like what you planned. |
|
|
|
Post by McF on Dec 12, 2011 8:52:40 GMT 1
did you check the paint code?
The Candy Bourgogne (Burgundy) Red should be R-107C-U
Assuming the parts are standard for your bike, this code should be on a sticker under your seat and should also have been the code on your paint
as Micawber says, the paint may have faded, if so, has it done so evenly?
|
|
|
|
Post by thatsawkward on Dec 12, 2011 11:40:13 GMT 1
Latest update: checked the paintwork early this morning and it still looks significantly different/wrong.
Paint code on the bike is R-107C-U as expected. Checked the paint order which corresponds and the paint tin says Honda Candy Bourgogne Red (but no code).
I've mailed the paint provider with a photo and a description of everything I did to see if they can find the source of the issue. Their initial feedback is that it sounds like I've done everything right and there should NOT be the colour difference that I've got, so they are investigating their mix....
In any event, I'll be moving on to the electrics, finishing the forks and doing some polishing - I'll park painting for a while !!
Thanks everyone for your advice and guidance...
|
|
|
|
Post by Jaz66 on Dec 12, 2011 23:54:41 GMT 1
Am i missing something here...? i thought that RJ's bike was more of a red colour..and from the looks of it so is yours, TA in that avatar.  BUT that colour looks way more brown then red. Maybe it's meant to be and i have missed a post or two. real pity that with all the work you have put in some of the finishing details could cause so much hassle. IF the colour is wrong and if it is red you wanted......i say bite the bullet and go back to the paint people and get the right colour. ( do think the red really suits the NTV..) You will only regret it once the bike is all back together and you looking at it mentally saying "That's not the colour i wanted ".....  and i agree with all of Micawbers post but this in particular.. as I recall from the photos is extremely tidy so I wouldn't risk messing up the paintwork on that. I would let the fairing paint dry thoroughly for a day or so then lacquer a small part such as the panel that joins the side panels at the bottom. |
|
|
|
Post by yellowmelos on Dec 13, 2011 13:22:47 GMT 1
What colour was the primer.. was it the silver you used in the other picture.. primer colour can affect final colour,
also the laqure will aslo give it a difffernt shine.
still does not look red
|
|


 ? Anyone??